Summary of changes:
- Adding the p4runtime starter code and solution.
- Adding NO_P4, BMV2_SWITCH_EXE and P4C_ARGS to utils/Makefile
- Updated p4runtime/Makefile to use variables
- Adding conversion functions for match and action param values
- Separating P4Info and P4Runtime libraries
- Updating global README and adding p4runtime/README.md
- Disabling screen saver on VM GUI
- Adding desktop icons for Terminal, Wireshare and Sublime Text
- Updating topo.pdf -> png for Markdown viewing in basic_tunnel and
  p4runtime READMEs
Implementing a Control Plane using P4 Runtime
Introduction
In this exercise, we will be using P4 Runtime to send flow entries to the
switch, instead of using the switch's CLI. We will be using the same P4
program that you used in the previous in the basic_tunnel exercise. The
P4 program has be renamed to advanced_tunnel.py and has been augmented
with a counter, tunnelCount, and two new actions, myTunnel_ingress
and myTunnel_egress.
You will use the starter program, mycontroller.py, and a few helper
libraries in the p4runtime_lib directory to create the table entries
necessary to tunnel traffic between host 1 and 2.
Spoiler alert: There is a reference solution in the
solutionsub-directory. Feel free to compare your implementation to the reference.
Step 1: Run the (incomplete) starter code
The starter code for this assignment is in a file called mycontroller.py
and it will install only some of the rules that you need tunnel traffic between
two hosts.
Let's first compile the new P4 program, start the network, use mycontroller.py
to install a few rules, and look at the tunnel ingress counter to see that things
are working as expected.
-
In your shell, run:
makeThis will:
- compile
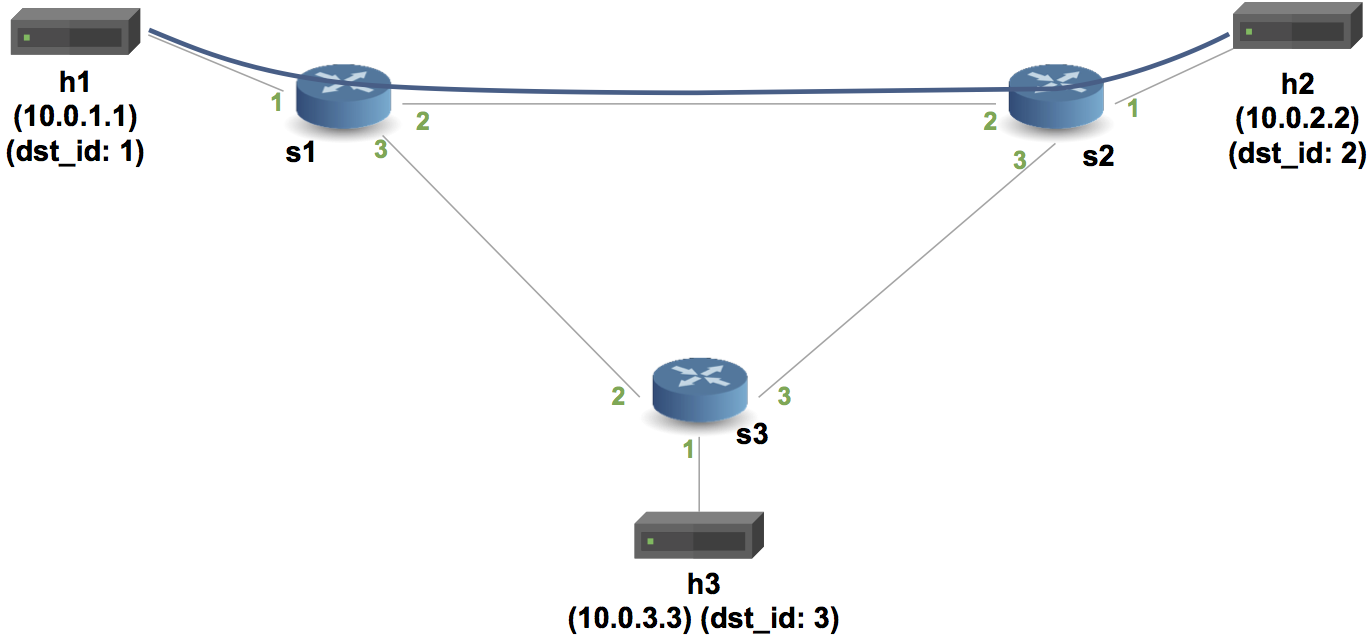
advanced_tunnel.p4, and - start a Mininet instance with three switches (
s1,s2,s3) configured in a triangle, each connected to one host (h1,h2, andh3). - The hosts are assigned IPs of
10.0.1.1,10.0.2.2, etc.
- compile
-
You should now see a Mininet command prompt. Start a ping between h1 and h2:
mininet> h1 ping h2Because there are no rules on the switches, you should not receive any replies yet.
-
Open another shell and run the starter code:
cd ~/tutorials/P4D2_2017_Fall/exercises/p4runtime
./mycontroller.py
This will install the
advanced_tunnel.p4program on the switches and push the tunnel ingress rules. The program prints the tunnel ingress and egress counters every 2 seconds. You should see the ingress tunnel counter for s1 increasing:s1 ingressTunnelCounter 100: 2 packetsThe other counters should remain at zero.
-
Press
Ctrl-Cto the second shell to stopmycontroller.py
Each switch is currently mapping traffic into tunnels based on the destination IP address. Your job is to write the rules that forward the traffic between the switches based on the tunnel ID.
A note about the control plane
A P4 program defines a packet-processing pipeline, but the rules
within each table are inserted by the control plane. In this case,
mycontroller.py implements our control plane, instead of installing static
table entries like we have in the previous exercises.
Important: A P4 program also defines the interface between the
switch pipeline and control plane. This interface is defined in the
advanced_tunnel.p4info file. The table entries that you build in mycontroller.py
refer to specific tables, keys, and actions by name, and we use a P4Info helper
to convert the names into the IDs that are required for P4 Runtime. Any changes
in the P4 program that add or rename tables, keys, or actions will need to be
reflected in your table entries.
Step 2: Implement Tunnel Forwarding
The mycontroller.py file is a basic controller plane that does the following:
- Establishes a gRPC connection to the switches for the P4 Runtime service.
- Pushes the P4 program to each switch.
- Writes tunnel ingress and tunnel egress rules for two tunnels between h1 and h2.
- Reads tunnel ingress and egress counters every 2 seconds.
It also contains comments marked with TODO which indicate the functionality
that you need to implement.
Your job will be to write the tunnel transit rule in the writeTunnelRules function
that will match on tunnel ID and forward packets to the next hop.
Step 3: Run your solution
Follow the instructions from Step 1. If your Mininet network is still running, you will just need to run the following in your second shell:
./my_controller.py
You should start to see ICMP replies in your Mininet prompt, and you should start to see the values for all counters start to increment.
Extra Credit and Food for Thought
You might notice that the rules that are printed by mycontroller.py contain the entity
IDs rather than the table names. You can use the P4Info helper to translate these IDs
into entry names.
Also, you may want to think about the following:
-
What assumptions about the topology are baked into your implementation? How would you need to change it for a more realistic network?
-
Why are the byte counters different between the ingress and egress counters?
-
What is the TTL in the ICMP replies? Why is it the value that it is? Hint: The default TTL is 64 for packets sent by the hosts.
Cleaning up Mininet
If the Mininet shell crashes, it may leave a Mininet instance running in the background. Use the following command to clean up:
make clean
Running the reference solution
To run the reference solution, you should run the following command from the
~/tutorials/P4D2_2017_Fall/exercises/p4runtime directory:
solution/my_controller.py
Next Steps
Congratulations, your implementation works! Move onto the next assignment ecn!