**Table of Contents** *generated with [DocToc](https://github.com/thlorenz/doctoc)*
- [P4 SIGCOMM 2015 Tutorial](#p4-sigcomm-2015-tutorial)
- [Introduction](#introduction)
- [Obtaining required software](#obtaining-required-software)
- [Before starting the exercises](#before-starting-the-exercises)
- [Exercise 1: Source Routing](#exercise-1-source-routing)
- [Description of the EasyRoute protocol](#description-of-the-easyroute-protocol)
- [A few hints](#a-few-hints)
- [Populating the tables](#populating-the-tables)
- [Testing your code](#testing-your-code)
- [Debugging your code](#debugging-your-code)
- [Exercise 2: Implementing TCP flowlet switching](#exercise-2-implementing-tcp-flowlet-switching)
- [What is flowlet switching?](#what-is-flowlet-switching)
- [Running the starter code](#running-the-starter-code)
- [What you need to do](#what-you-need-to-do)
# P4 SIGCOMM 2015 Tutorial
The original webpage for the tutorial can be found
[here](http://conferences.sigcomm.org/sigcomm/2015/tutorial-p4.php)
## Introduction
This repository include 2 exercises we presented at SIGCOMM: *Source Routing*
and *Flowlet Switching*. Both exercises assume that you possess basic networking
knowledge and some familiarity with the P4 language. Please take a look at the
[P4 language spec](http://p4.org/spec/) and at the example `simple_router`
target [on
p4lang](https://github.com/p4lang/p4factory/tree/master/targets/simple_router/p4src).
*Source Routing* asks you to write a P4 program from scratch to implement a
custom source routing protocol. *Flowlet Switching* is more difficult: you will
start from a simple P4 routing program (with ECMP) and implement a version of
flowlet switching, which yields better load balancing for bursty TCP flows.
For both exercises, you will find a .tar.gz archive which contains the solution
files.
## Obtaining required software
To complete the exercises, you will need to clone 2 p4lang Github repositories
and install their dependencies. To clonde the repositories:
- `git clone https://github.com/p4lang/behavioral-model.git bmv2`
- `git clone https://github.com/p4lang/p4c-bm.git p4c-bmv2`
The first repository ([bmv2](https://github.com/p4lang/behavioral-model)) is the
second version of the behavioral model. It is a C++ software switch that will
behave according to your P4 program. The second repository
([p4c-bmv2](https://github.com/p4lang/p4c-bm)) is the compiler for the
behavioral model: it takes P4 program and output a JSON file which can be loaded
by the behavioral model.
Each of these repositories come with dependencies. `p4c-bmv2` is a Python
repository and installing the required Python dependencies is very easy to do
using `pip`: `sudo pip install -r requirements.txt`.
`bmv2` is a C++ repository and has more external dependencies. They are listed
in the
[README](https://github.com/p4lang/behavioral-model/blob/master/README.md). If
you are running Ubuntu 14.04+, the dependencies should be easy to install (you
can use the `install_deps.sh` script that comes with `bmv2`). Do not forget to
build the code once all the dependencies have been installed:
- `./autogen.sh`
- `./configure`
- `make`
You will also need to install `mininet`, as well as the following Python
packages: `scapy`, `thrift` (>= 0.9.2) and `networkx`. On Ubuntu, it would look
like this:
- `sudo apt-get install mininet`
- `sudo pip install scapy thrift networkx`
## Before starting the exercises
You need to tell us where you cloned the `bmv2` and `p4c-bm` repositories
:). Please update the values of the shell variables `BMV2_PATH` and
`P4C_BM_PATH` in the `env.sh` file - located in the root directory of this
repository. Note that if you cloned both repositories in the same directory as
this one (`tutorials`), you will not need to change the value of the variables.
That's all :)
## Exercise 1: Source Routing
Place yourself in the `source_routing` directory.
In this problem, we will implement a very simple source routing protocol in
P4. We will call this protocol EasyRoute. You will be designing the P4 program
from scratch, although you are of course welcome to reuse code from other
targets in p4lang. To test your implementation, you will create a Mininet
network and send messages between hosts. We provide a skeleton program:
[source_routing/p4src/source_routing.p4](source_routing/p4src/source_routing.p4),
you need to implement the parser and the ingress control flow.
### Description of the EasyRoute protocol
The EasyRoute packets looks like this:
```
preamble (8 bytes) | num_valid (4 bytes) | port_1 (1 byte) | port_2 (1 byte) |
... | port_n (1 byte) | payload
```
The preamble is always set to 0. You can use this to distinguish the EasyRoute
packets from other packets (Ethernet frames) your switch may receive. We do not
guarantee that your P4 switch will exclusively receive EasyRoute packets.
The num_valid field indicates the number of valid ports in the header. If your
EasyRoute packet is to traverse 3 switches, num_valid will initially be set to
3, and the port list will be 3 byte long. When a switch receives an EasyRoute
packet, the first port of the list is used to determine the outgoing port for
the packet. num_valid is then decremented by 1 and the first port is removed
from the list.
We will use the EasyRoute protocol to send text messages. The payload will
therefore correspond to the text message we are sending. You do not have to
worry about the encoding of the text message.
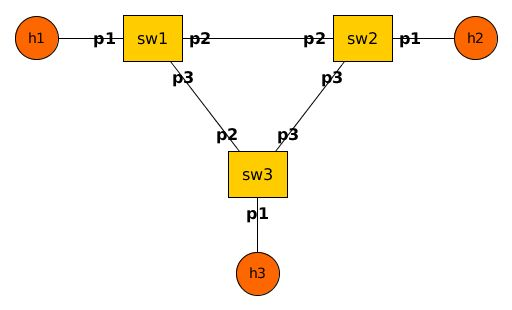
If I wish to send message "Hello" from h1 to h3, the EasyRoute packet will look
like this:
- when it leaves h1:
`00000000 00000000 | 00000002 | 03 | 01 | Hello`
- when it leaves sw1:
`00000000 00000000 | 00000001 | 01 | Hello`
- when it leaves sw3:
`00000000 00000000 | 00000000 | Hello`
Note that the last switch should not remove the EasyRoute header; otherwise the
application running in the end hosts won’t be able to handle incoming packets
properly.
Your P4 implementation needs to adhere to the following requirements:
1. **all non-EasyRoute packets should be dropped**
2. **if a switch receives an EasyRoute packet for which num_valid is 0, the
packet should be dropped**
### A few hints
1. in the start parse state, you can use `current()` to check if the packet is
an EasyRoute packet. A call to `current(0, 64)` will examine the first 64 bits
of the packet, **without shifting the packet pointer**.
2. do not forget that a table can match on the validity of a header. Furthermore
if a header is not valid, our software switch will set all its fields to 0.
3. a table can "match" on an empty key, which means the default action will
always be executed - if configured correctly by the runtime. Just omit the
"reads" attribute to achieve this.
4. you can remove a header with a call to `remove_header()`
5. when parsing the EasyRoute header, you do not have to parse the whole port
list. Actually P4 is currently missing language constructs needed to parse a
general Type-Length-Value style header[1](#myfootnote1), and hence
you’ll need to simply extract the first port of the list and ignore the rest
(including the payload). Also preamble, num_valid and the port number don't have
to all be placed in the same header type.
6. finally, we advise you to put all your logic in the ingress control flow and
leave the egress empty. You will not need more than 1 or 2 tables to implement
EasyRoute.
1: Members of [P4.org](http://p4.org) are working
together to come up with language constructs needed to be able to parse
TLV-style headers soon.
### Populating the tables
Once your P4 code is ready (you can validate it easily by running `p4-validate`
on it), you need to think about populating the tables. We made it easy for you:
you just have to fill the commands.txt file with `bmv2` CLI commands. We think
that you only need to know 2 commands:
- `table_set_default [action_data]`: this is used to
set the default action of a given table
- `table_add => [action_data]`: this
is used to add an entry to a table
You can look at example commands in the `flowlet_switching` directory:
[flowlet_switching/commands.txt](flowlet_switching/commands.txt) and match them
with the corresponding P4 tables
[flowlet_switching/p4src/simple_router.p4](flowlet_switching/p4src/simple_router.p4).
### Testing your code
./run_demo.sh will compile your code and create the Mininet network described
above. It will also use commands.txt to configure each one of the switches.
Once the network is up and running, you should type the following in the Mininet
CLI:
- `xterm h1`
- `xterm h3`
This will open a terminal for you on h1 and h3.
On h3 run: `./receive.py`.
On h1 run: `./send.py h1 h3`.
You should then be able to type messages on h1 and receive them on h3. The
`send.py` program finds the shortest path between h1 and h3 using Dijkstra, then
send correctly-formatted packets to h3 through s1 and s3.
### Debugging your code
.pcap files will be generated for every interface (9 files: 3 for each of the 3
switches). You can look at the appropriate files and check that your packets are
being processed correctly.
## Exercise 2: Implementing TCP flowlet switching
Place yourself in the `flowlet_switching` directory and run
`sudo ./veth_setup.sh`.
### What is flowlet switching?
Flowlet switching leverages the burstiness of TCP flows to achieve better load
balancing of TCP traffic. In this exercise, you will start from a program
that load-balances based on layer 4 flows: this is generally considered
"classic" ECMP. To do this, we compute a hash over the 5-tuple and use this
value to choose from a set of possible next hops. This means that all packets
belonging to the same flow (i.e. with the same 5-tuple) will be routed to
the same nexthop. You need to enhance this P4 code with additional logic to
implement flowlet switching.
We suggest implementing flowlet switching as follows:
1. Compute a crc16 hash over the regular TCP 5-tuple, using the
`modify_field_with_hash_based_offset()` P4 primitive. We already use this
primitive in the ECMP starter code, so take a look. This hash will identify each
TCP flow (note: we do not care about collisions in this case).
2. For each flow, you need to store 2 things: a) a timestamp for the last
observed packet belonging to this flow and b) a flowlet_id. Flowlet switching
is very simple: for each packet which belongs to the flow, you need to update
the timestamp. Then, if the time delta between the last observed packet and the
current packet exceeds a certain timeout value (in our case, we suggest using
50ms), then the flowlet_id needs to be incremented. Note that in data centers
with mostly short, high-speed links, this timeout value will typically be much
smaller. With flowlet switching, packets belonging to the same TCP burst will
have the same flowlet_id, but packets in 2 different bursts (i.e. separated by a
timeout) will have a different flowlet_id. This also implies that we must
maintain some state for each TCP flow. To maintain state in P4, you will need to
use 'register' objects (look them up in the spec). In this case, you will need
to use two separate registers for each packet (one for the timestamp and one for
the flowlet_id). The software switch will generate a timestamp for each new
packet and store it in the metadata field
`intrinsic_metadata.ingress_global_timestamp`. This is a 32 bit value, expressed
in microseconds. You can read it in the ingress pipeline, but don't try to write
to it.
3. Once you have obtained the flowlet_id, you can compute a new hash. This
time, the hash will include the 5-tuple AND the flowlet_id. You will use this
hash exactly like we used our hash in the starter code, as an offset into a
nexthop table. This part of the exercise actually mostly reuses the starter
code. Your changes to tables `ecmp_group` and `ecmp_nhop` should be minimal.
### Running the starter code
To compile and run the starter code, simply use `./run_demo.sh`. This time we
will not be using Mininet, we will instead generate simple TCP test packets and
send them individually to the switch to observe how it behaves. `run_demo.sh`
will start the switch and populate the tables using the CLI commands from
[flowlet_switching/commands.txt](flowlet_switching/commands.txt).
When the switch is running, you can send test packets with `sudo
./run_test.py`. Note that this script will take a few seconds to complete. The
tests sends a few hundred identical TCP packets through the switch, in bursts,
on port 3. If you take a look at commands.txt, you will see that each TCP packet
can either go out of port 1 or port 2, based on the result of the hash
computation. The script prints the list of outgoing ports. Since all packets are
identical and we are using "regular" ECMP, all the packets should come out of
the same port and you will see either a thousand "1"s or a thousand "2"s when
you run the test. If you were to alter the test script (example: modify the TTL
value of the input TCP packets), the output should randomly choose between port
1 and port 2.
Note that the test script (and commands.txt) assume the following topology:
```
--------------------------------- nhop-0 10.0.1.1
| 00:04:00:00:00:00
1 - 00:aa:bb:00:00:00
|
-------- 3--sw
|
2 - 00:aa:bb:00:00:01
|
--------------------------------- nhop-1 10.0.2.1
00:04:00:00:00:01
```
Both `nhop-0` and `nhop-1` have a path to `10.0.0.1`, which is the final
destination of our test packet.
### What you need to do
1. Update the provided [P4 program](flowlet_switching/p4src/simple_router.p4) to
perform TCP flowlet switching. In our case, it requires adding 2 tables to the
ingress pipeline. Remember that you can omit the 'reads' attribute for a table.
In this case, providing you configure the default action of the table correctly,
the default action will always be performed.
2. Update [commands.txt](flowlet_switching/commands.txt) to configure your new
tables.
3. Run the above test again. Observe how the list of ports alternate between 1
and 2. You will need to edit the test script if you chose not to use a 50ms
(50,000 microseconds!) timeout for the flowlet_id.